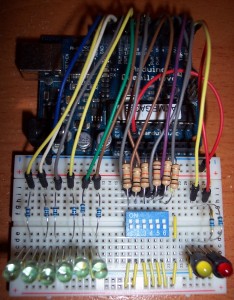
 This is a very simple project that controls a set of LEDs using a DIP switch. The purpose of the sketch is to show the use of some Arduino serial communication functions, and to increase familiarity interfacing with digital I/O pins.
(Here is the schematic for this project)
Two LEDs were connected to the RX and TX pins on the Arduino (digital pins 0 and 1), but remember to disconnect these pins while the sketch is being uploaded.
Parts list:
- Arduino Duemilanove (or Arduino Uno)
- Breadboard
- 8 LEDs, assorted colors (or you can also get a grab bag of assorted types and colors)
- Jumper wire, assorted lengths
- DIP switch
- 6 10K Ohm resistors (pull up)
- 8 100 Ohm resistors (current limiting)
Sketch:
// www.TinkerHobby.com
// Natalia Fargasch Norman
// LED control via DIP switches

// Arduino pins used for the LEDs
#define LED1 13
#define LED2 12
#define LED3 11
#define LED4 10
#define LED5 9
#define LED6 8

// Arduino pins used for the switches
#define S1 7
#define S2 6
#define S3 5
#define S4 4
#define S5 3
#define S6 2

// State of each switch (0 or 1)
int s1state;
int s2state;
int s3state;
int s4state;
int s5state;
int s6state;

void setup() {
  // pins for LEDs are outputs
  pinMode(LED1, OUTPUT);
  pinMode(LED2, OUTPUT);
  pinMode(LED3, OUTPUT);
  pinMode(LED4, OUTPUT);
  pinMode(LED5, OUTPUT);
  pinMode(LED6, OUTPUT);
  // pins for switches are inputs
  pinMode(S1, INPUT);
  pinMode(S2, INPUT);
  pinMode(S3, INPUT);
  pinMode(S4, INPUT);
  pinMode(S5, INPUT);
  pinMode(S6, INPUT);
  // setup serial port
  Serial.begin(9600);
  Serial.println("Serial port open");
}

void loop() {
  s1state = digitalRead(S1);
  digitalWrite(LED1, s1state);
  s2state = digitalRead(S2);
  digitalWrite(LED2, s2state);
  s3state = digitalRead(S3);
  digitalWrite(LED3, s3state);
  s4state = digitalRead(S4);
  digitalWrite(LED4, s4state);
  s5state = digitalRead(S5);
  digitalWrite(LED5, s5state);
  s6state = digitalRead(S6);
  digitalWrite(LED6, s6state);
  Serial.print(s1state);
  Serial.print(s2state);
  Serial.print(s3state);
  Serial.print(s4state);
  Serial.print(s5state);
  Serial.print(s6state);
  Serial.println();
}
Here’s a video of the project in action.

 Arduino Protection: How to Make Sure Your Project Won’t Kill Your Arduino
 Motion and Light Sensors with Arduino (and Without)
 LED Patterns Using DIP Switch and Arduino
 Lumex Graphic LCD Road Test

Here’s I want to share a cool stuff that can help us to design an electrical circuit more easily.. its can download for free..
https://tech2play.blogspot.com/2011/05/fritzing-electronics-software.html
have fun.. 🙂
Thought I’d take a crack at your dip switch circuit and refactor the code a bit. Included it in the following blog post.
https://www.mmaitlen.com/2017/01/refactor-arduino-code-using-dip-switch-to-control-leds/